

When I built my first WooCommerce store, I assumed English-only was fine. Most of my traffic was from the US, so why bother? Then I checked my analytics and saw a chunk of visitors dropping off on product pages, and a lot of them were coming from Spain, France, and Germany.
That was the moment I realized I was leaving money on the table. People shop in their own language. They trust stores that speak it. Without translated product pages, my checkout funnel was bleeding international customers before they even got close to clicking “Buy.”
That’s why Universally is the right solution. It’s an AI-powered translation service that turns any WooCommerce store into a multilingual storefront in minutes, with no manual product-by-product translating, no extra plugins, and no SEO headaches. I’ve set it up on multiple WooCommerce stores now, and the workflow is the same every time.
In this guide, I’ll show you how to create a multilingual WooCommerce store in three easy steps. By the end, your products, cart, and checkout will be available in any language you choose, fully indexed by search engines, and ready to convert international customers.
Quick Summary: Install the Universally plugin on your WordPress site, paste in your API key from the Universally dashboard, and pick the languages you want your store available in. Add a language switcher and you’re done. Total setup time: about 5 minutes.
Why Sell Your WooCommerce Store in Multiple Languages?
If you’ve never thought of your store as a multilingual store, here’s why it matters.
You reach customers your competitors can’t. Most WooCommerce stores stay English-only because translating products feels like a huge project. The moment yours is available in Spanish, French, or German, you’re showing up for searches your English-only competitors can’t touch.
Translated stores convert better. Shoppers are far more likely to buy from a site in their native language. When the product description, the “Add to Cart” button, and the checkout fields are all in their language, the friction disappears.
It’s a real SEO win. Google indexes translated pages as separate URLs (like yourstore.com/es/ or yourstore.com/fr/), and when those pages have proper hreflang tags and translated meta titles, they show up in local search results. Multilingual SEO is one of the cheapest ways to grow organic traffic.
You build trust. A buyer in Madrid is far more likely to trust a store that greets them in Spanish than one that forces them to mentally translate the checkout. Trust matters even more for a first-time order.
What You’ll Need Before You Start
Before we dive in, make sure you have:
- A WordPress site with WooCommerce already installed and configured (and at least one product in your catalog)
- About 5 minutes to complete the setup
- A free Universally account (you can create one as part of Step 1)
You don’t need any technical knowledge or coding skills. If you can install a WordPress plugin, you can finish this tutorial.
Step 1: Install the Universally Plugin and Connect Your Store
The first step is to install the Universally plugin on your WordPress site and connect it to your Universally account. This is the only setup work you’ll do inside WordPress.
Install the Plugin
In your WordPress admin dashboard, go to Plugins » Add New. In the search bar at the top right, type “Universally” and press Enter.
When the Universally plugin appears, click the Install Now button. After the installation finishes (it takes a few seconds), the button changes to Activate. Click it.
You’ll now see a new Universally menu item in your WordPress sidebar. That’s your sign that the plugin is ready.
Create Your Project in the Universally Dashboard
Now head over to universally.com and sign up for a free account. The free plan covers your first 2,000 translated words and one target language, which is plenty to test the integration on a small WooCommerce catalog.
Once you’re logged in, click the Add Project button. Enter your store’s domain (for example, mystore.com) and choose your source language (the language your store is currently in, usually English).
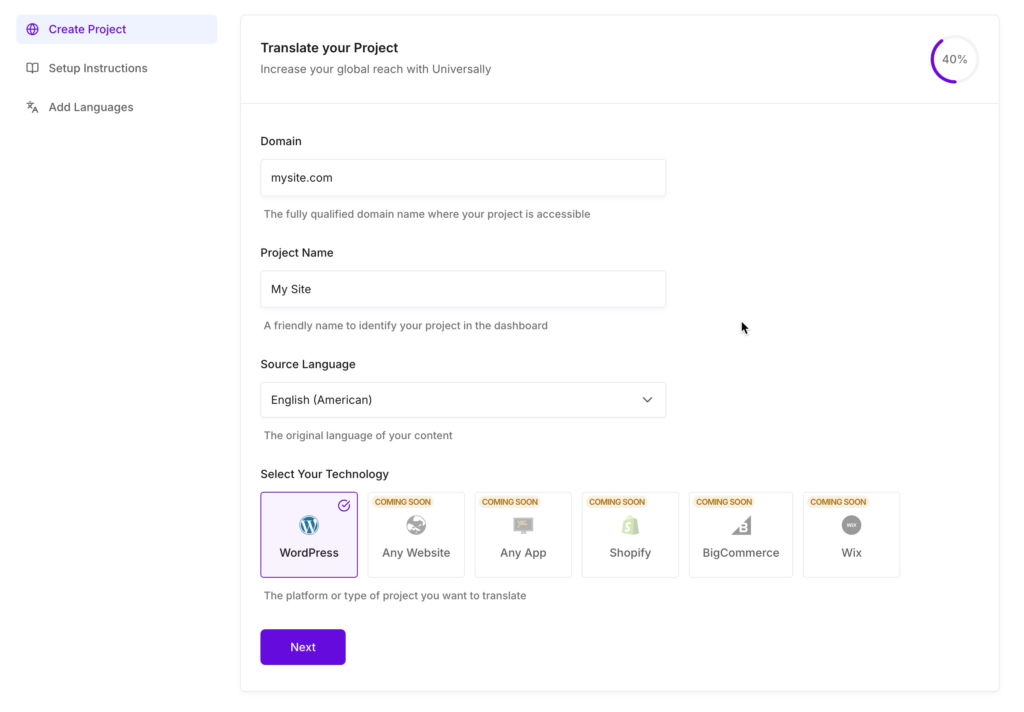
Click Create Project. Don’t worry about adding target languages yet, we’ll do that in Step 2.
Copy Your API Key
After creating the project, click into it and select the API Keys tab in the sidebar. You’ll see a 64-character API key. Click the copy button next to it.
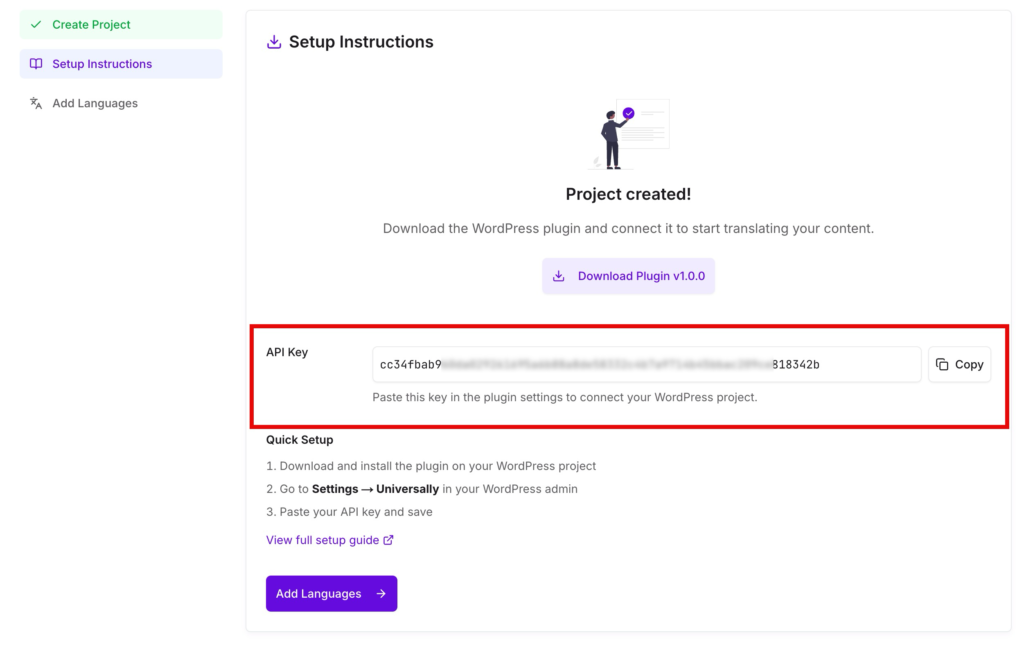
This API key is what tells your WooCommerce store and Universally to talk to each other. Keep it private. Don’t share it publicly or commit it to a public repository.
Paste Your Key Into WordPress
Back in your WordPress admin, click Universally in the sidebar. You’ll land on the settings page. Paste your API key into the API Key field, then click Save Settings.
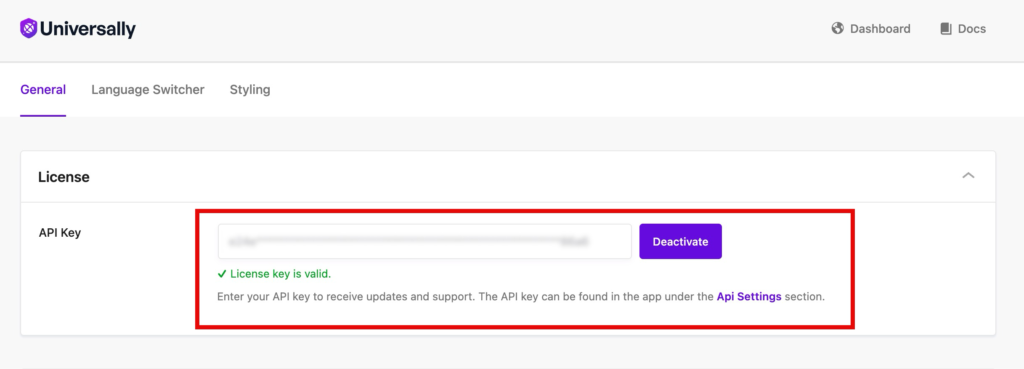
The plugin verifies the key automatically. When you see the green “License Key is Valid” confirmation, your WooCommerce store is officially linked to Universally.
If you want a deeper walkthrough of these substeps, see our guides on Installing the Plugin and Connecting Your Site.
Step 2: Add Your Target Languages
Now that your store is connected, it’s time to choose which languages you want it available in. This is the fun part.
In the Universally dashboard, open your project and click the Languages tab. You’ll see a list of every language Universally supports (over 110 of them, including all the major European, Asian, and Middle Eastern languages).
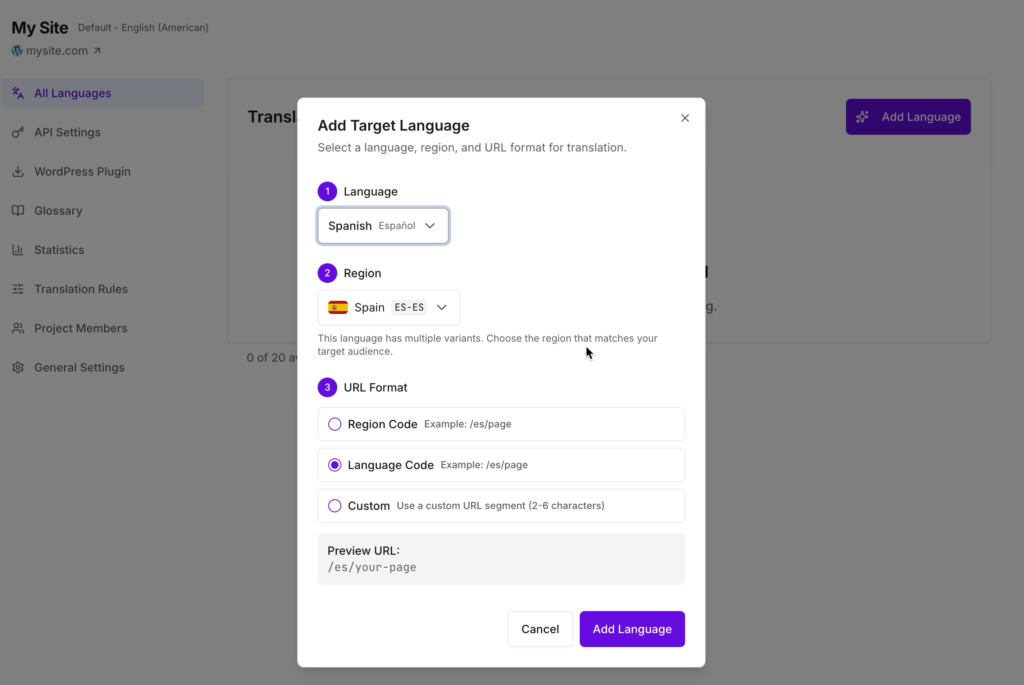
Click Add Language and pick the ones you want. For most WooCommerce stores starting out, I recommend these three:
- Spanish (es). Opens up Spain, Mexico, and most of Latin America.
- French (fr). Covers France, Belgium, parts of Canada, and several large African markets.
- German (de). Germany has the largest e-commerce market in continental Europe.
You can add more, or pick different ones based on where your customers are coming from. Check your Google Analytics country report if you’re not sure where to start.
When you’ve added your languages, click Save. That’s it. Universally is now ready to translate your store into every language you selected.
Test It Right Away
Open a new browser tab and visit your store with a language prefix in the URL. For example:
https://yourstore.com/es/for Spanishhttps://yourstore.com/fr/for Frenchhttps://yourstore.com/de/for German
Note: Depends entirely how you’ve det up these urls when adding the languages. The example above assumes you’ve used the defaults.
The first time a page is requested in a new language, Universally translates it on the fly. This takes a few seconds. After that, the translation is cached and loads instantly for every subsequent visitor.
Visit a product page, the cart, and the checkout in your new language. You should see everything translated: product titles, descriptions, “Add to Cart” buttons, price labels, shipping options, and form fields. If something looks off, don’t worry. We’ll cover refinements in the bonus section.
Step 3: Add a Language Switcher to Your Store
Right now, customers can reach translated pages by typing the URL prefix manually. But realistically, they need a visible button. That’s where the language switcher comes in.
The Universally plugin includes a built-in language switcher that automatically lists every language you enabled in Step 2. You have two ways to add it.
Option A: Auto Position (Easiest)
In your WordPress admin, go to Universally » Language Switcher. Make sure Auto is selected, then choose where you want the switcher to appear from the Position dropdown:
- Bottom Right (default)
- Bottom Left
- Top Right
- Top Left
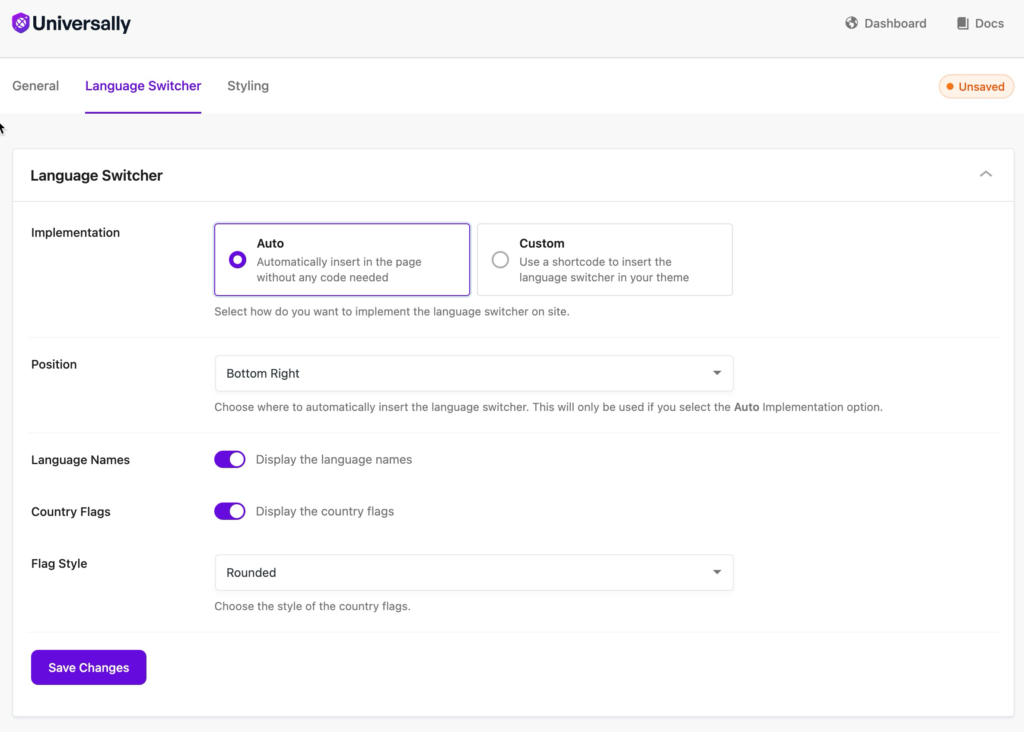
Click Save Settings. The switcher now floats on every page of your store, including product pages, the cart, and the checkout.
Option B: Custom Placement (Header, Menu, or Footer)
If you want the switcher in your header, your main menu, or somewhere specific in your theme, switch the toggle to Custom. You’ll see two snippets you can use.
Shortcode. Drop this into any post, page, widget area, or block-based template:
[universally_switcher]
PHP code. Paste this into your theme template files (for example, header.php):
if (function_exists('universally_switcher')) {
   universally_switcher();
}
Most store owners prefer adding the switcher to the header or main menu so it’s visible from the moment a visitor lands. If you’re using a block-based theme, you can also use the Universally Language Switcher block from the block inserter (the + button).
For a deeper look at switcher placement and best practices, see our guide on the Language Switcher.
That’s it. Three steps, and your WooCommerce store is officially multilingual.
What Gets Translated Automatically
One of the reasons I recommend Universally for WooCommerce is that you don’t have to translate anything manually. There’s no per-product translation interface, no string tables, no waiting for a translator. As soon as a visitor requests a page in another language, Universally translates the entire HTML in real time.
Here’s what gets translated automatically across your store:
Product pages. Titles, descriptions, attributes, variations, custom fields, “Add to Cart” buttons, related-products labels, and review headings.
Shop and category pages. All product cards, sort dropdowns, filter labels, pagination, and breadcrumbs.
Cart and checkout. Field labels (Billing Address, Shipping Method, Payment Details), placeholders, button text (“Place Order”, “Apply Coupon”), order summaries, and validation messages rendered in HTML.
SEO and metadata. Page titles, meta descriptions, Open Graph tags, Twitter Card tags, and JSON-LD structured data are all translated. The lang attribute on <html> is updated, and right-to-left languages get the dir="rtl" attribute automatically. This is the unsexy stuff that makes Google index your translated pages correctly.
Forms. Placeholders (“Enter your email”), labels, help text, and accessibility attributes (aria-label, aria-labelledby). Visitors filling out your contact, signup, or product-question forms see them in their language.
If you want the full breakdown of what does and doesn’t get translated, see our guides on Multilingual SEO and Multilingual Forms.
Note: Universally translates page content rendered as HTML. It doesn’t change product prices into different currencies, since currency conversion is a separate problem. If you need multi-currency support, pair Universally with a dedicated currency plugin.
Bonus: Use Glossary Rules to Protect Brand Names and Product Codes
Once your store is live in multiple languages, you may notice the AI translates terms you’d rather it leave alone. Common examples for WooCommerce stores:
- Brand names (“Nike”, “Levi’s”)
- Product names that include common words (translating “Apple Watch” literally turns “Watch” into the local word for clock, which gets confusing fast)
- Product codes and SKUs
- Trademarked terms
That’s where glossary rules come in. In your Universally dashboard, open your project and go to Glossary. Click Add Rule and choose a rule type:
- Keep. Leaves the term untouched in every language. Perfect for brand names, SKUs, and trademarks.
- Translate. Forces a specific translation for a term in a specific language. Handy for region-specific marketing terms or industry jargon where you want exact wording.
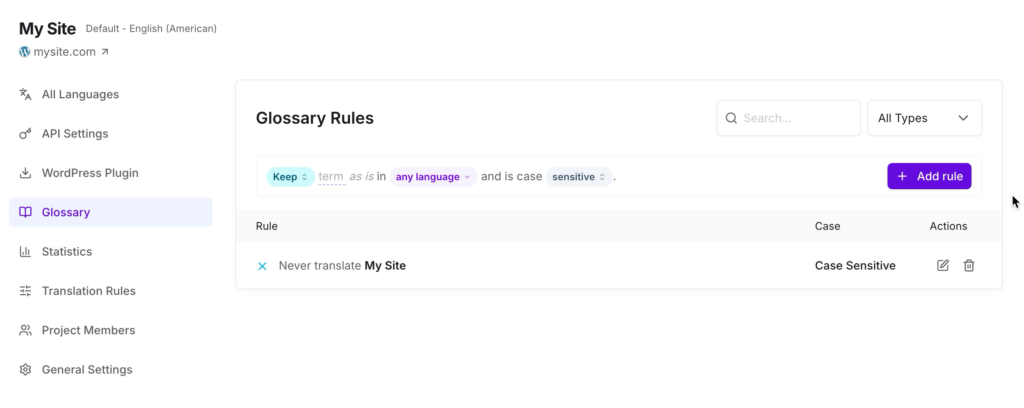
For example, you might add a Keep rule for your brand name so the AI never translates it, and a Translate rule that forces “Free Shipping” to become “Envío Gratis” in Spanish, instead of whatever literal translation the AI would otherwise pick. Once added, every translated page across your store respects the rule.
Note: Glossary rules with language-specific overrides are available on paid plans. The free plan covers the basics: 2,000 translated words and one target language. See Universally pricing for details.
For more on this, read our Glossary Rules guide.
You’re Live in Three Easy Steps
Three steps, about five minutes of work, and your WooCommerce store now speaks your customers’ language. Visitors anywhere in the world can browse your products, drop them into a cart, and check out fully in Spanish, French, German, or any of the 100-plus languages you choose to enable. Search engines can index every translated page, and you didn’t have to translate a single product manually.
If you’re just getting started, your next move is to enable a couple of languages and check your analytics in a week. You’ll be surprised how fast non-English traffic starts showing up.
You might also want to read our guide on Multilingual SEO to see exactly how Universally optimizes your translated pages for international search.
Frequently Asked Questions
Is Universally free?
Yes, Universally has a free plan that covers up to 2,000 translated words and one target language. That’s enough to translate a small WooCommerce catalog into one language and see how it works on your store. For more languages or more content, see the pricing page.
Will Universally slow down my WooCommerce store?
Translations are cached after the first request, so the second time anyone visits a translated page (in any language), it loads at full speed. The first translation request takes a few extra seconds while the AI processes the page, but it only happens once per page per language. Your original English store stays as fast as it was before.
Does Universally translate WooCommerce product variations and attributes?
Yes. Anything that appears as visible HTML on a product page (sizes, colors, materials, custom attributes, variation labels) gets translated automatically when a visitor loads the page in another language.
Will Google rank my translated WooCommerce pages?
Yes, and that’s actually one of the biggest reasons to use Universally. Translated pages are served at clean URLs (like yourstore.com/es/product/blue-shirt/), with translated meta titles, descriptions, hreflang tags, and structured data. Google indexes them as separate language versions and shows them in regional search results.
Do I need to translate my WooCommerce emails too?
Universally translates HTML pages as visitors request them. WooCommerce transactional emails (order confirmations, shipping notifications) are sent server-side, so they’re handled separately from the page-translation flow. For email translation, you’d typically use a dedicated email-localization plugin alongside Universally.


Add a Comment