

When I launched my first WordPress site for an international audience, I was sure translating it would be the easy part. I was wrong. I spent weeks copying posts into duplicate pages, fighting with translation plugins that wanted me to manage every string by hand, and watching my SEO get worse instead of better.
The truth is that most of the “make WordPress multilingual” advice out there is built around an old idea: that you have to duplicate your content, language by language, and maintain it forever. That used to be the only option. It isn’t anymore.
That’s why I created Universally. It’s an AI translation platform that turns any WordPress site into a fully multilingual website, automatically, with no duplicated posts, no manual string tables, and no SEO gymnastics. You install a plugin, connect it to your account, pick the languages you want, and your site is live in every one of them.
In this guide, I’ll show you how to create a multilingual WordPress website step by step. By the end, your pages, navigation, meta tags, and structured data will all be available in any language you choose, fully indexed by search engines, and ready for an international audience.
Quick Summary:
Sign up for a Universally account, create a project for your site, pick your target languages, then install the Universally WordPress plugin and paste in your API key. Add a language switcher to your theme and you’re done. Total setup time: about 5 minutes.
Why Create a Multilingual WordPress Website?
If you’ve never thought of your WordPress site as a multilingual website, here’s why it’s worth doing.
You reach audiences your competitors miss. Most WordPress sites stay in one language because translating content feels like a huge project. The moment yours is available in Spanish, French, German, or Japanese, you’re showing up for searches your single-language competitors can’t.
Visitors trust sites that speak their language. Readers spend longer, scroll deeper, and convert more often when content is in their native language. Whether you’re running a blog, a portfolio, a SaaS landing page, or a small-business site, the friction of “I have to mentally translate this” disappears.
It’s a real SEO win. Google indexes translated pages as separate URLs (such as yoursite.com/es/ or yoursite.com/fr/). When those pages have proper hreflang tags and translated meta titles, they show up in regional search results. Multilingual SEO is one of the cheapest ways to grow organic traffic.
Modern AI translation makes it practical. A few years ago, machine translation produced awkward word-for-word output that you’d be embarrassed to publish. Today’s AI is context-aware, gets idioms right, handles tense and grammar naturally, and produces translations that read like a native speaker wrote them.
The Two Ways to Make WordPress Multilingual
Before we dive in, it helps to understand the two main approaches. They’re very different in practice.
Option 1: Manual or duplicated content
This is the older approach used by traditional translation plugins. For every post or page, you create a translated copy. You maintain that copy by hand. Every time you edit the original, you have to remember to update each language version too.
It works, but the maintenance gets exhausting fast. Five posts in three languages means fifteen versions to keep in sync. Add SEO tags, image captions, and menu items, and the workload doubles.
Option 2: On-demand AI translation
This is what Universally does. You don’t duplicate posts. When a visitor requests a page in another language, Universally translates the entire HTML on the fly using AI, then caches the result so subsequent visits load instantly. New posts are translated automatically the first time anyone views them. Edits to the original page show up in every translated version on the next request.
There’s no separate post to maintain, no string table to manage, and no “translate everything” batch button to remember. For most WordPress sites, this is the workflow that actually scales.
The rest of this tutorial assumes you’re going with Option 2. If you’ve used a traditional plugin before and you’re tired of duplicating content, this approach is going to feel like a relief.
What You’ll Need Before You Start
Before we get going, make sure you have:
- A WordPress site (version 6.0 or later) with PHP 7.4 or later
- About 5 minutes to complete the setup
- A Universally account (you can pick a plan or get started for free in Step 1)
You don’t need any technical knowledge or coding skills. If you can install a WordPress plugin, you can finish this tutorial.
Step 1: Sign Up for a Universally Account
The first thing to do is create your Universally account. Head over to the Universally pricing page and either pick a plan or get started for free.
Once you sign up, a workspace is created for you automatically and you’ll land in your Universally dashboard. The dashboard is where you’ll manage your projects, pick your target languages, and grab the API key your WordPress site will use.
If you’ve never seen the dashboard before, take a minute to look around. Everything you’ll do in the next few steps lives in two tabs: Languages and API Keys.
Step 2: Create Your Project
A project in Universally represents a single website. If you have multiple WordPress sites, you’ll create one project per site. Each project gets its own API key and its own set of target languages.
In the dashboard, click the Add Project button. You’ll see a short form asking for two things:
- Domain. Enter your site’s domain, such as
example.com. Don’t includehttps://or a trailing slash. - Source language. This is the language your site is currently written in. For most readers that’s English (US), but pick whichever matches your existing content.
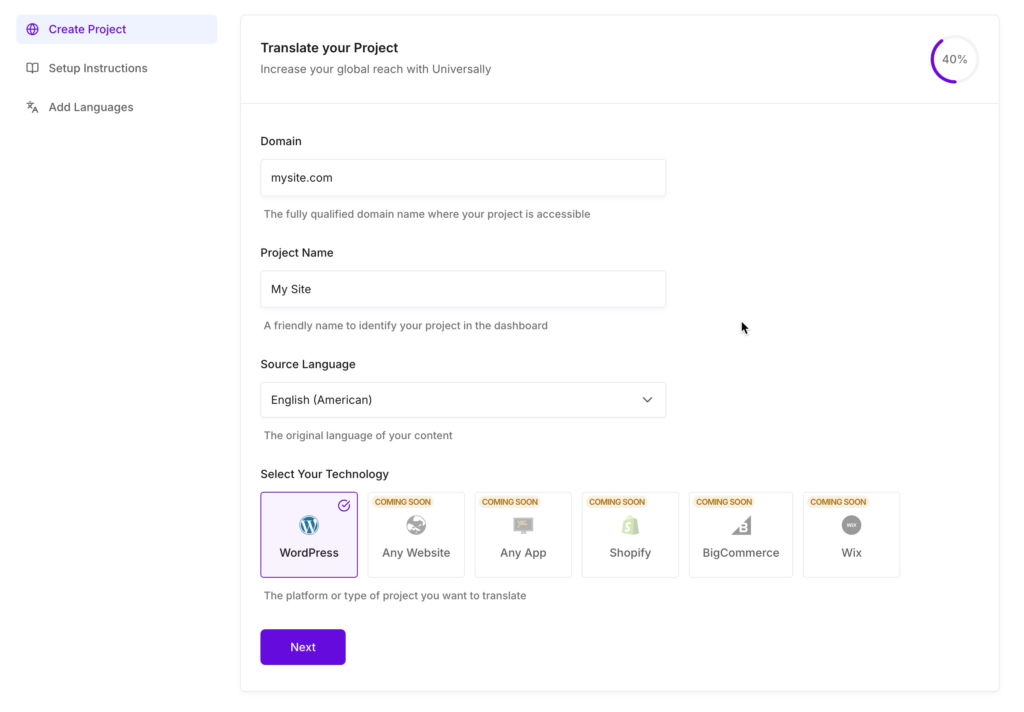
Click Create Project to confirm. You’ll be taken to your new project’s overview page. Don’t worry about adding target languages yet, that’s the next step.
Step 3: Choose Your Target Languages
Now for the fun part. Click into your project and open the Languages tab. You’ll see a button labeled Add Language.
Click it, and a searchable list opens up with every language Universally supports (over 70 of them, including all the major European, Asian, Middle Eastern, and African languages). Each entry shows the language flag, native name, and English name.
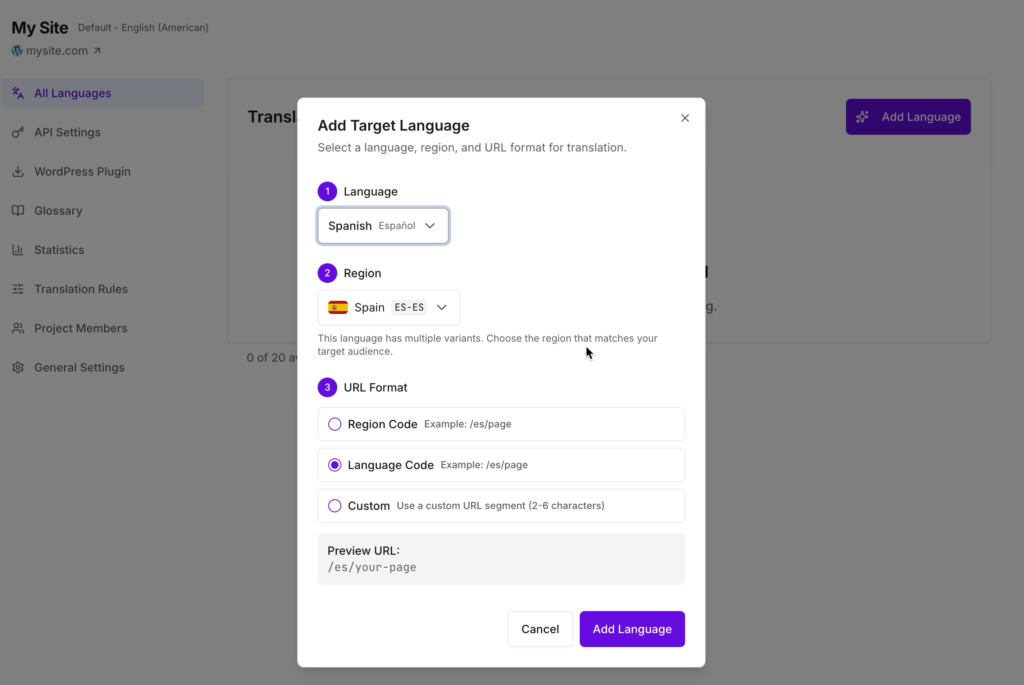
For most sites starting out, I recommend adding one or two languages first. You can always add more later. A few popular starter combinations:
- Spanish. Opens up Spain, Mexico, and most of Latin America.
- French. Covers France, Belgium, Quebec, and a number of large African markets.
- German. The largest e-commerce and content market in continental Europe.
- Japanese. Strong tech and e-commerce audience.
- Arabic. Right-to-left layouts are handled automatically.
Not sure where to start? Check your Google Analytics country report to see where your existing traffic is coming from, then prioritize those languages.
When you’ve picked your languages, click Save. Universally is now ready to translate your site into every language you selected.
Note about regional variants. Some languages have regional variants you can choose from, like French (France) versus French (Canada), or Portuguese (Brazil) versus Portuguese (Portugal). Pick the variant that matches your audience. They count separately toward your plan limit, so only add both if you genuinely need both.
Step 4: Install the Universally WordPress Plugin
First, you’ll have to log in to your Universally dashboard and open the project you just created.
In the project sidebar, click WordPress Plugin. You’ll see a widget at the top of the page with a Download v{version} button.
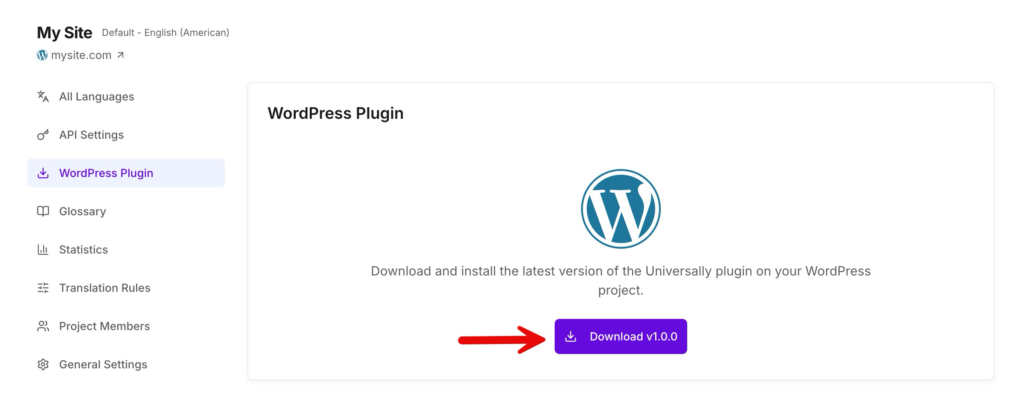
When the Universally plugin appears, click the Install Now button. Once the installation finishes (it takes a few seconds), the button changes to Activate. Click it.
After activation, you’ll see a new Universally menu item appear in your WordPress admin sidebar. That’s your sign that the plugin is ready.
For more details about the install process, including how to install manually from a .zip file, see our guide on Installing the Plugin.
Step 5: Connect Your Site With Your API Key
The plugin needs to know which Universally project to talk to. We do that with an API key.
Get Your API Key
Back in your Universally dashboard, open your project and click the API Keys tab in the sidebar. You’ll see a 64-character API key. Click the copy button next to it.
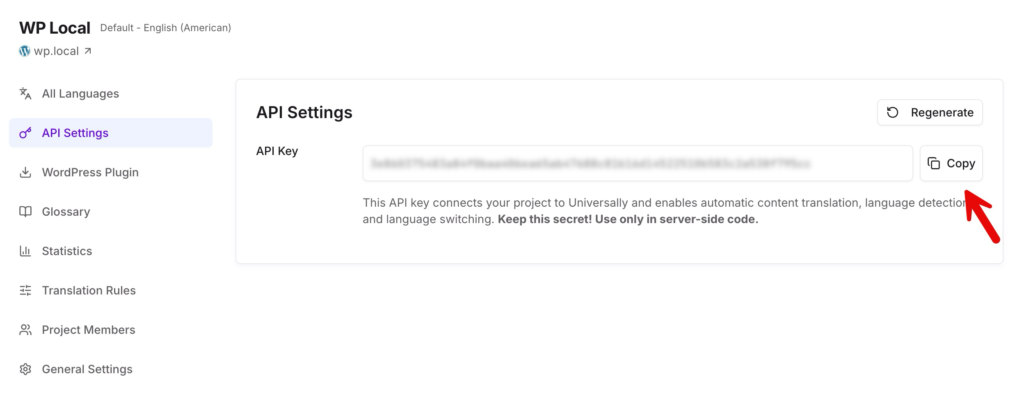
This API key is what tells your WordPress site and Universally to talk to each other. Keep it private. Don’t paste it into a public repository, share it on social media, or send it in plain emails.
Paste It Into WordPress
In your WordPress admin, click Universally in the sidebar. You’ll land on the plugin’s settings page. Paste your API key into the API Key field, then click Save Settings.
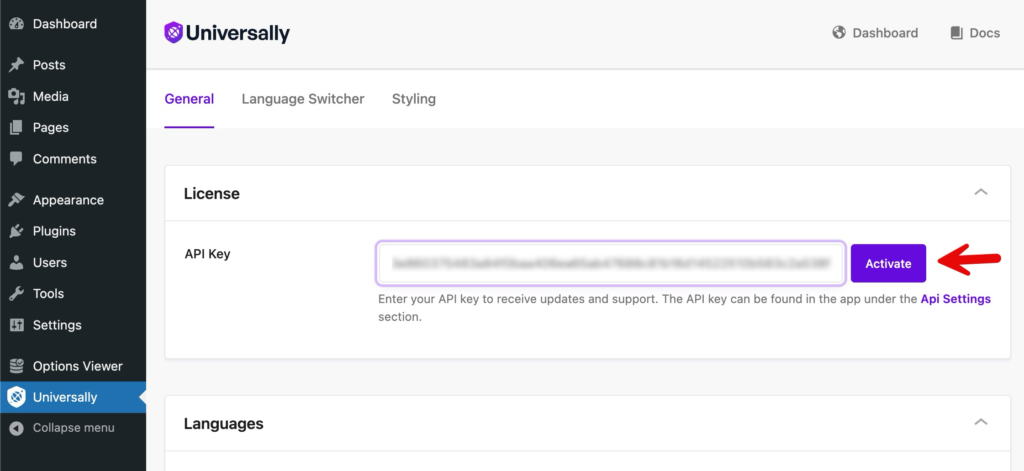
The plugin verifies the key automatically. When you see the green “Connected” confirmation, your WordPress site is officially linked to Universally.
Step 6: Visit Your Translated Site
Time for the moment of truth. Open a new browser tab and visit your site with a language prefix in the URL. For example https://yoursite.com/es/ if you added Spanish with the es url code (which is the default).
The first time a page is requested in a new language, Universally translates it on the fly. This takes a few seconds. After that, the translation is cached, and every subsequent visitor loads it instantly.
Click around. Visit your blog posts, your About page, your contact form. You should see everything translated: headings, body text, navigation, footer, button labels, and form placeholders. The page title in your browser tab and the description Google sees are translated too, even though those aren’t visible on the page.
If something looks off, don’t worry. We’ll cover refinements in Step 8.
Step 7: Add a Language Switcher
Right now, visitors can reach translated pages by typing the URL prefix manually. In practice, they’ll never do that. They need a visible button.
That’s where the language switcher comes in. The Universally plugin includes a built-in switcher that automatically lists every language you enabled in Step 3. You have two ways to add it.
Option A: Auto Position (easiest)
In your WordPress admin, go to Universally » Language Switcher. Make sure Auto is selected, then choose where you want the switcher to appear from the Position dropdown:
- Bottom Right (default)
- Bottom Left
- Top Right
- Top Left
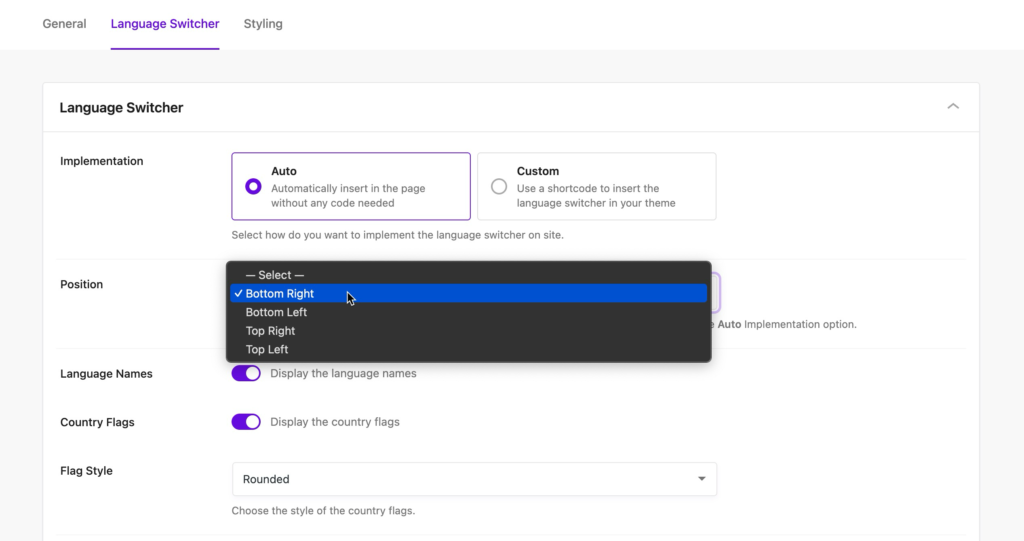
Click Save Settings. The switcher now floats on every page of your site, including blog posts, archives, and your homepage.
Option B: Custom Placement (header, menu, or footer)
If you want the switcher in your header, your main menu, or somewhere specific in your theme, switch the toggle to Custom. You’ll see two snippets you can use.
Shortcode. Drop this into any post, page, widget area, or block-based template:
[[universally_switcher]]PHP code. Paste this into your theme template files (for example, header.php):
if (function_exists('universally_switcher')) {
   universally_switcher();
}
If you’re using a block-based theme, you can also add the switcher with the Universally Language Switcher block from the block inserter (the + button). Search for “Universally” and drop it into your header, navigation block, or any other template part.
Most site owners put the switcher in the header or main menu, since that’s where visitors expect to find it. For a deeper look at switcher placement and best practices, see our guide on the Language Switcher.
Step 8: Customize What Gets Translated (Optional)
Once your site is live in multiple languages, you might want to fine-tune what gets translated and what doesn’t. Universally gives you three customization tools that all live in your project’s Settings tab.
Exclude pages
Some pages should never be translated. Common examples:
- Legal pages that have to stay in their original language for compliance (terms of service, privacy policy)
- Admin or internal pages
- Pages with checkout flows where translation could confuse payment processors
Open the Exclude Pages setting and enter one URL path per line. You can use exact paths (/terms-of-service) or wildcard patterns (/admin/*). For full details, see our guide on Exclude Pages.
Glossary rules
Once your site is live, you may notice the AI translates terms you’d rather it leave alone. Common examples for WordPress sites:
- Brand names (“Apple”, “Nike”, your own company name)
- Product or service names that include common words
- Technical terms or trademarks
Open the Glossary tab in your project and click Add Rule. You’ll choose between two rule types:
- Keep. Leaves the term untouched in every language. Perfect for brand names, product codes, and trademarks.
- Translate. Forces a specific translation in a specific language. Useful when the AI’s default translation isn’t quite the wording you want.
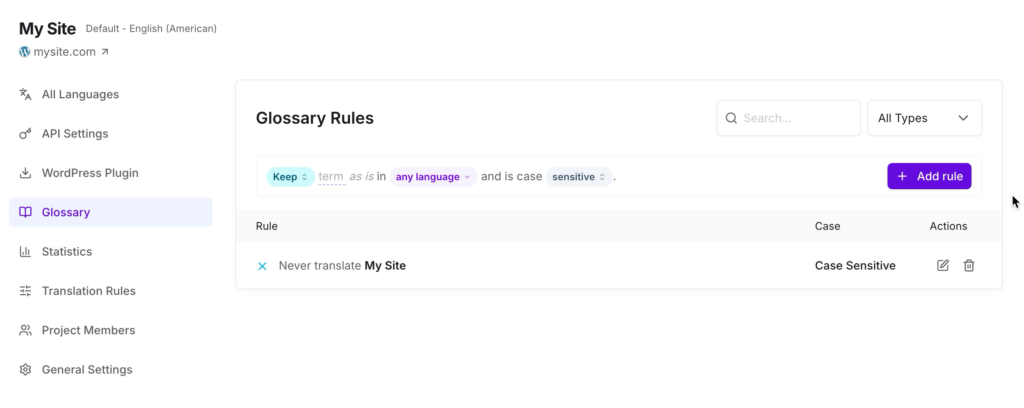
Once added, every translated page across your site respects the rule.
Note: Glossary rules with language-specific overrides are available on paid plans. See Universally pricing for plan details.
For more on this, see our Glossary Rules guide.
Choose your URL structure
By default, Universally puts translated pages in subdirectories (like yoursite.com/fr/). This works out of the box and requires no DNS changes.
If you’d rather use subdomains (fr.yoursite.com), you can switch to subdomain mode in your project settings. Subdomain mode requires a DNS configuration change before it works. For most sites, the default subdirectory mode is the simpler choice. See URL Structure for the full breakdown.
Step 9: Multilingual SEO (Already Done For You)
Multilingual SEO is the part most tutorials make sound complicated. With Universally, it’s already done.
Every translated page you serve includes:
- Translated meta tags. The
<title>and<meta name="description">tags are translated automatically, so search results show the correct language. - Translated Open Graph and Twitter Card tags. When someone shares your page on social media, the preview shows the translated version.
- Translated structured data. JSON-LD and
itempropschema markup are translated, so rich search results (articles, products, FAQs) display correctly in each language. - Correct language and direction attributes. The
langattribute on the<html>tag matches the target language. For right-to-left languages (Arabic, Hebrew, Persian, Urdu), thedir="rtl"attribute is set automatically. - Rewritten internal links. Links on translated pages point to the translated versions of other pages, so visitors stay in their chosen language as they navigate.
You don’t have to add anything to your theme. You don’t have to install an SEO plugin add-on. There’s no hreflang configuration to manage. It just works.
If you want the full breakdown of every SEO element that gets translated, see details on Multilingual SEO.
Best Practices for a Multilingual WordPress Site
Now that your site is multilingual, here’s a short list of things I’ve learned the hard way over the years.
Start with one or two languages, then expand. It’s tempting to enable ten languages at once. Don’t. Start with one or two, verify the translation quality on a few key pages, and expand from there. Adding languages later is a one-click operation.
Put the switcher somewhere visible. Visitors are more likely to switch languages if the switcher is in the header or main menu. Tucking it into the footer cuts its discoverability dramatically.
Test in an incognito window. After enabling a new language, visit your site in a private browser window so you bypass any caching plugins. Click around, especially on pages with forms, dynamic content, or third-party widgets.
Use glossary rules early. As soon as you spot a brand name or term you don’t want translated, add a Keep rule. It’s much easier to do this proactively than to fix dozens of pages later.
Check it on mobile. The language switcher is responsive, but always confirm it looks right on a small screen, especially if you’ve enabled many languages.
Watch your analytics. Multilingual traffic can take a few weeks to ramp up as Google reindexes your translated pages. Keep an eye on your country and language reports to see where new visitors are coming from.
You’re Live in Nine Steps
That’s it. Your WordPress site is now a fully multilingual website. Visitors anywhere in the world can read your content in their own language, navigate around without leaving it, and search engines can index every translated version of every page.
A quick recap of what you accomplished:
- Signed up for a Universally account
- Created a project for your site
- Picked your target languages
- Installed the Universally WordPress plugin
- Connected your site with your API key
- Confirmed translated pages render correctly
- Added a language switcher
- Customized what gets translated (optional)
- Got automatic multilingual SEO out of the box
If you’re just getting started, your next move is to pick one or two languages, add a switcher, and check your analytics in a few weeks. You’ll be surprised how fast non-English traffic starts showing up.
You might also want to read our guide on Multilingual SEO to see exactly how Universally optimizes your translated pages for international search, and our Glossary Rules guide to keep your brand names consistent across every language.
Frequently Asked Questions
Is Universally free?
Yes, Universally has a free plan that covers a small set of translated words and one target language. That’s enough to translate a starter site into one language and see how everything works on your own pages. For more languages or more content, see the pricing page for the available plans.
Will Universally slow down my WordPress site?
No. Translations are cached after the first request, so the second time anyone visits a translated page (in any language), it loads at full speed. The first translation request takes a few extra seconds while the AI processes the page, but it only happens once per page per language. Your original site stays as fast as it was before.
Does Universally work with WooCommerce, Elementor, or other page builders?
Yes. Universally translates the rendered HTML of any WordPress page, regardless of how it was built. That means it works with WooCommerce stores, Elementor designs, Gutenberg blocks, classic editor posts, custom themes, and pretty much every other page-building tool in the WordPress ecosystem. If your visitors can see it in the browser, Universally can translate it.
Can I edit individual translations if I don’t like the AI’s wording?
Yes. Universally is built around AI translation by default, but you can override specific terms with Glossary Rules (forcing a specific translation for a specific term in a specific language). For broader edits, you can also use CSS selectors to exclude specific page sections from translation entirely.
Do I need to know any code?
No. The whole setup is point-and-click in the WordPress admin and the Universally dashboard. The only time you’d touch code is if you want to place the language switcher in a very specific spot in your theme, and even then we give you a copy-paste shortcode that doesn’t require editing any PHP.
How accurate are the translations?
Universally uses modern context-aware AI translation, which produces results that read naturally and handle idioms, tense, and grammar correctly. It’s substantially better than the word-for-word machine translation of a few years ago. For terms where you want absolute control over wording (brand names, slogans, industry jargon), use Glossary Rules to pin the exact translation.


Add a Comment