
Two-factor authentication adds a second step to signing in, so a stolen password is not enough on its own. Universally supports codes by email and codes from an authenticator app, plus recovery codes for when you lose access to both.
Before you start
Enabling or disabling a method asks for your current password again, and so does generating recovery codes. Revoking a session, revoking a trusted device and changing your default method do not.
If you signed up with Google, set a password first. A Google-only account has no password, and without one none of the steps that ask for it will go through. Change your password explains how to add one. Signing in with Google still gets the two-factor prompt once a method is enabled, so this is about enrolling, not about which button you use to sign in.
Choose a method
| Method | How it works | Good for |
|---|---|---|
| Authenticator app | A 6-digit code from an app such as 1Password, Authy, or Google Authenticator, refreshing every 30 seconds | Everyday use. Works with no network. |
| A 6-digit code sent to your account email when you sign in | Simpler setup, but only as secure as your email account |
You can enrol both. If you have both, you choose which to use at sign-in.
With both enrolled, hover a configured row and choose Set as Default to pick which one the sign-in prompt opens first. The chosen one carries a Default badge. It is not only cosmetic: for email, the default is the one that gets a code sent before you ask for it. Every enrolled method stays available at sign-in whichever is default.
Set up an authenticator app
- Open the user menu and choose Account Settings, then Two-factor & sessions.
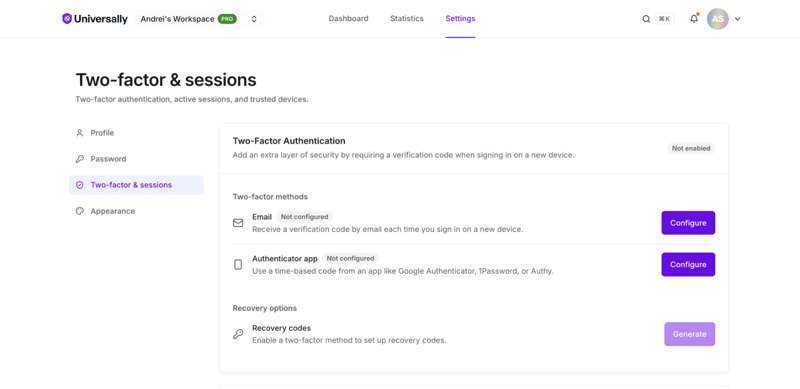
- Under Two-Factor Authentication, find the Authenticator app row and choose Configure.
- Confirm your current password.
- Scan the QR code with your app, or enter the setup key by hand.
- Enter the 6-digit code your app shows, to confirm the two are in sync.
The method is active once that code is accepted. Enrolment is not complete until you confirm a code, so a half-finished setup never locks you out.
Set up email codes
- Open the user menu and choose Account Settings, then Two-factor & sessions.
- Under Two-Factor Authentication, find the Email row and choose Configure.
- Confirm your current password.
- Enter the 6-digit code sent to your account email.
Signing in with two-factor enabled
After your password, you are asked for a code.
The challenge is valid for 10 minutes. If you take longer, sign in again to get a new one. Email codes are 6 digits and single use.
Five wrong codes cancel the challenge. You are sent back to the sign-in page and start again, even if the 10 minutes have not run out.
If an emailed code does not arrive, choose Resend code rather than starting over. That sends a fresh code and resets the attempt count on the same challenge.
Tick Remember this device for 30 days to skip the code on that browser next time. See Active sessions for managing those devices.
Recovery codes
Recovery codes are your way back in if you lose your phone and your email. Generate them once two-factor is active, and store them somewhere other than the device running your authenticator.
- Open the user menu and choose Account Settings, then Two-factor & sessions.
- Generate recovery codes, and enter your current password when asked.
- Save the 10 codes you are shown.
Each code works once, and they look like k3n7p-q9rst.
Two things to know before you generate them:
You need an active method first. Recovery codes cannot be generated before you have set up an authenticator app or email codes.
Generating replaces the old set. Any codes from a previous batch stop working immediately, so update wherever you stored them.
If you lose access
Use a recovery code in place of your usual code at sign-in.
If you have no method and no recovery codes left, contact support at [email protected] from the email address on the account. Support cannot bypass two-factor on request, so keeping recovery codes somewhere safe is what protects you here.
When your workspace requires two-factor
A workspace Owner or Admin can require two-factor authentication for everyone in the workspace. If that is switched on and you have no verified method, you are blocked from the workspace and its projects until you enrol: the projects, members and billing screens all refuse.
Your own Account Settings stay reachable, which is where you set a method up. Once one is verified, access returns with no further steps.
Members are notified when the requirement is switched on, and the switch is only available to an Owner or Admin who has two-factor themselves. See Workspaces.